A soft white sweet roll dough that can be used in a variety of dessert recipes
Yield:
12-24 servings
Ingredients:
2 c flour 1 T dry yeast 1 c milk 1/4 c sugar 1/4 c shortening 1 t salt 2 eggs 1 1/2-2 c flour
Instructions:
1. In large mixer bowl, combine 2 cups flour and 1 T dry yeast.
2. Heat milk, sugar, shortening, and salt till warm (115-120°), stirring to melt shortening. Add to dry mixture.
3. Add eggs. Mix well by hand and then stir in 1 1/2 to 2 cups flour, making a moderately stiff dough.
4. Knead on a lightly floured surface till smooth (adding more flour as you need it, if needed). Shape into a ball. Place in a greased bowl, turning once. Cover; let rise till double.
5. Punch down; divide in half. Cover; let rest 10 minutes.
This recipe is from Tammy’s Recipes.
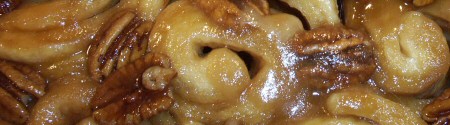
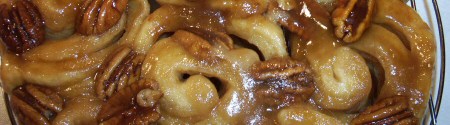
Caramel Pecan Rolls
Soft and sweet caramel-covered rolls, bursting with pecans
Yield:
24 rolls
Ingredients:
Basic Sweet Roll Dough**  3 T butter, softened 1/2 c granulated sugar 1 t ground cinnamon  2/3 cup packed brown sugar 1/4 c butter 2 T light corn syrup  1/2 c chopped or halved pecans
2. Brush each with half of the softened butter. Combine granulated sugar and cinnamon; sprinkle over dough.
3. Roll up each piece of dough, starting with long side; seal seams. Slice each roll into about 12 pieces.*Â
4. In saucepan combine brown sugar, 1/4 c butter, and corn syrup. Cook and stir just till butter melts and mixture is blended.
5. Distribute mixture evenly in two greased 8-9 inch round baking pans. Top with pecans.
6. Place rolls, cut side down, in baking pans (on top of the pecans). Cover; let rise till double.
7. Bake at 375 degrees for 18 to 20 minutes. Cool about 30 seconds; invert on rack and remove pans.
This recipe is from Tammy’s Recipes.
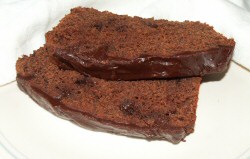
Triple Chocolate Quick Bread
A sweet chocolate quick bread with chocolate chips inside, topped with a homemade chocolate glaze
Yield:
10-12 servings
Ingredients:
1/2 cup butter, softened 2/3 cup (packed) brown sugar 2 eggs 1 cup (6 ounces) semi-sweet chocolate chips, melted 1 1/2 cups applesauce 2 teaspoons vanilla 2 1/2 cups flour 1 teaspoon baking soda 1 teaspoon baking powder 1 teaspoon salt 1/2 (3 ounces) cup miniature semi-sweet chocolate chips
Chocolate glaze ingredients:
1/2 cup (3 ounces) semi-sweet chocolate chips 1 Tablespoon butter 2-3 Tablespoons half and half cream 1/2 cup powdered sugar 1/4 teaspoon vanilla Pinch of salt
Instructions:
1. In mixing bowl, cream butter and sugar. Add eggs and melted chocolate, mixing well. Add applesauce and vanilla and stir well.
2. In another bowl, combine flour, baking soda, baking powder, and salt. Add to creamed mixture and mix until lumps are removed. Stir in chocolate chips.
3. Spread batter into one large greased loaf pan (8x4x3in.) or into four small greased loaf pans (5-1/2x3x2-in.). Bake at 350 degrees for 45 minutes or until bread tests done.
4. Cool in pans 10 minutes and then remove to a wire rack to finish cooling.
5. Make glaze: Melt chocolate chips and butter; stir in cream. Remove from heat and add sugar, vanilla, and salt. Drizzle over warm bread.
This recipe is from Tammy’s Recipes.
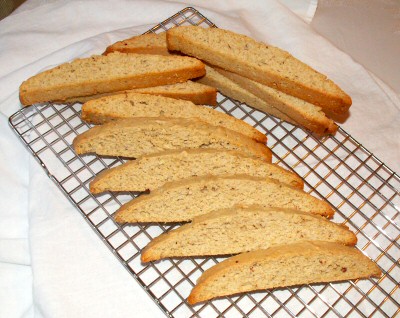
Almond Chestnut Biscotti
An aromatic semi-sweet biscotti with almond, vanilla, and chestnut flavors, baked to a light dry texture
Yield:
2-3 dozen slices
Ingredients:
1 + 1/2 cups fresh drinking water 2 tablespoons (dry) chestnut flavored black tea 1 1/2 cups sugar 3/4 cup oil 4 eggs 1 1/2 tablespoons double-strength vanilla extract 1 1/2 tablespoons almond extract 5 to 5 1/2 cups all-purpose flour 1/2 teaspoon salt 1 tablespoon baking powder 1 cup coarsely chopped almonds
Instructions:
1. Bring water to a near-boil. Pour one cup of the hot water into a heat-safe measuring container (I use a glass measuring cup) and allow to stand for several minutes until measuring container is hot. Discard the cup of hot water.
2. Measure 2 tablespoons of (dry) chestnut tea leaves into the pre-heated measuring cup. Add the remaining 1/2 cup of freshly heated water. Allow tea to brew for 3 minutes; strain*. The result should be approximately 1/4 cup of strong tea.
3. In a large mixing bowl, beat sugar, oil, and tea. Add eggs and extracts and stir gently until completely mixed.
4. Add 4 cups of the flour, the salt, baking powder, and the almonds. Mix into a thick batter, adding the rest of the flour as needed. Batter should be very thick but still able to be stirred.
5. Grease two 10 x 15-inch jelly roll pans or cookie sheets. Spread half of the batter on each sheet: begin by using your mixing spoon to spread the batter in a 3 or 4-inch wide strip the length of the cookie sheet. Continue adding batter, on the strip, making a mound of batter about 2 inches high and 4 or 5 inches wide, running the length of the sheet (about 14 inches).
6. Bake at 350 degrees for 30-40 minutes, until top seems dry and edges are browned. Rotate sheets half way through baking.
7. After baked, remove from oven and reduce temperature to 325 degrees. Allow loaves to cool on the sheets for about 10 minutes. Remove loaves, one at a time, to a cutting board. Using a serrated knife, gently slice loaves into 3/4-inch slices. Place slices, cut side down, back onto the sheets.
8. Return sheets to the oven and bake for an additional 20-30 minutes or until dry, turning pieces once midway through baking. Biscotti should be lightly browned and rather dry. Remove from sheets to wire racks and allow to completely cool for a crunchy, dry biscotti.
This recipe is from Tammy’s Recipes.
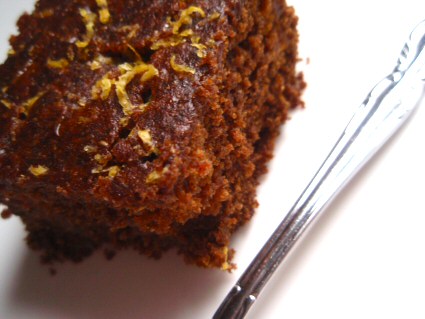
Lemon Glazed Gingerbread
A simple and hearty gingerbread square made with whole wheat flour and molasses which give it substance and sweetness, making the perfect snack
Yield:
12 pieces
Ingredients:
Gingerbread Ingredients:
1 cup whole wheat flour 3/4 cup all-purpose flour 1 1/2 teaspoons baking soda 1/2 teaspoon cinnamon 1/2 teaspoon nutmeg 1/2 teaspoon ginger 1 egg, lightly beaten 1/2 cup molasses 1/3 cup vegetable oil 1/2 cup boiling water
Lemon Glaze Ingredients:
1/2 cup powdered sugar 2 tablespoons lemon juice 1/2 teaspoon grated lemon peel
Instructions:
1. To make the gingerbread, begin by sifting together the dry ingredients.
2. Stir in the remaining gingerbread ingredients one by one, in the order they are listed.
3. Spread mixture into a greased and floured 8-inch square baking pan.
4. Bake at 350 degrees F for about 25 minutes or until gingerbread tests done with a toothpick.
5. While gingerbread is baking, mix together the ingredients for the lemon glaze.
6. When the gingerbread is removed from oven, immediately poke holes in the surface with a wooden pick and pour on glaze. (Dotting the surface allows the glaze to seep in evenly into the gingerbread.)
This recipe is from Tammy’s Recipes.
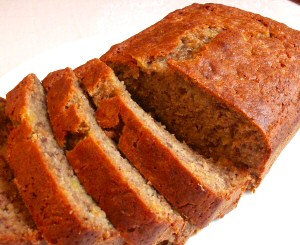
Banana Pineapple Bread
A soft, moist homemade quick bread with banana and pineapple
Yield:
2 loaves
Ingredients:
3 cups flour 1 teaspoon baking soda 1 teaspoon cinnamon 3/4 teaspoon salt 3 eggs 2 cups sugar 1 cup oil 2 teaspoons vanilla extract 2 cups mashed bananas (about 4 medium bananas) 1 cup crushed pineapple (with the excess liquid drained; this is almost the amount in a 15-ounce can of pineapple)
Instructions:
1. In large mixing bowl, combine flour, baking soda, cinnamon, and salt.
2. In another mixing bowl, beat together the eggs and sugar. Add remaining ingredients, beating until well mixed.
3. Pour wet ingredients into bowl of dry ingredients and stir until moistened. Don’t over-beat.
4. Pour batter into two greased and floured loaf pans (use smaller loaf pans — 6×3-inch, or use several mini loaf pans). Bake at 350 degrees for 60 minutes or until loaves test done.
This recipe is from Tammy’s Recipes.
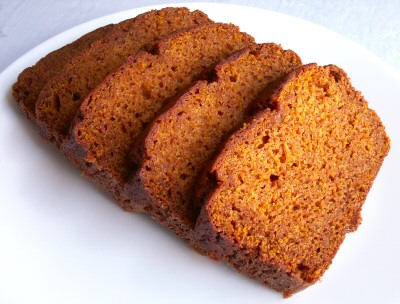
Pumpkin Spice Bread
A moist, sweet pumpkin quick bread with cinnamon and nutmeg
Yield:
2 loaves
Ingredients:
3 cups sugar 1 cup oil 3 eggs 2/3 cup water 2 cups pumpkin (or one, 15-ounce can) 1 cup chopped nuts, optional 3 cups flour 2 teaspoons cinnamon 1 1/2 teaspoons salt 1 teaspoon nutmeg 2 teaspoons baking soda 1 tablespoon baking powder
Instructions:
1. In a large mixing bowl, combine sugar, oil, and eggs. Stir in water and pumpkin (and nuts if using).
2. In a medium mixing bowl, combine remaining ingredients, whisking to mix well. Add to creamed mixture and beat until smooth.
3. Pour into two greased and floured 8×4-inch loaf pans. (You may use a different size pan, such as 9×5-inch, but loaves won’t be as tall.)
4. Bake at 350 degrees for 90 minutes or until bread tests done. Cool for 10 minutes in the pan, then remove to wire racks and cover with a cloth until cool.
This recipe is from Tammy’s Recipes.
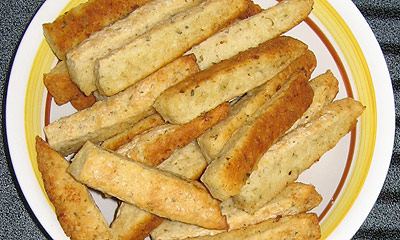
Quick and Easy Breadsticks
Quick and simple buttery bread sticks — garlic or cinnamon recipe variations included!
Yield:
8 servings
Ingredients:
1/4 cup (1/2 stick) butter or margarine 1 tablespoon oil 3 cups flour (I use part whole wheat, part unbleached) 1 teaspoon salt 1 tablespoon baking powder 3/4-1 cup milk
**See additional notes for ingredients and instructions to make garlic breadsticks or cinnamon breadsticks from this recipe!
Instructions:
1. Preheat oven to 425 degrees. Place butter and oil in 9×13 pan and put in oven so butter melts as the oven heats up. Be careful not to let it burn!
2. Stir dry ingredients together, and gradually add milk, stirring until dough forms and leaves sides of bowl. I don’t bother to actually measure out the milk – just add it gradually until there’s enough.
3. Knead 5-6 times in bowl; place on floured countertop and roll out into 9×13-inch rectangle.
4. Lay dough in pre-heated 9×13-inch pan, atop the melted butter/oil. Cut into 1/2″ strips. Bake at 425 degrees for 20 minutes.
This recipe is from Tammy’s Recipes.
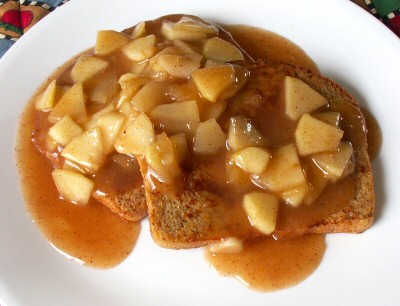
Cinnamon Apple French Toast
Slices of bread drenched in spiced egg, toasted and served with a cinnamon apple topping
Yield:
8 slices with topping (about 4 servings)
Ingredients:
Apple topping:
4 cups sliced peeled cooking apples (about 3 large apples) 1 1/2 cup water, divided 1 cup sugar* 1/4 teaspoon nutmeg 1 teaspoon cinnamon 3 tablespoons cornstarch or Clear Jel 1 tablespoon lemon juice, optional (use if apples aren’t tart)
1. Place apples in a saucepan with cinnamon, nutmeg, and one cup of the water. Cover, bring to a boil, and simmer for 5 minutes or until apples are tender (but not mushy!).
2. In a mixing bowl, whisk together the sugar and cornstarch. Add the remaining half cup of water, along with the lemon juice if using. Whisk until smooth. Add to boiling apples and cook and stir for one minute or until thickened.
3. Pre-heat and lightly oil a large skillet or griddle. Beat eggs, cinnamon, and nutmeg. Dip slices of bread into the egg mixture and then fry/toast on the griddle until bread is hot and the egg is completely cooked, flipping once during cooking.
4.Serve apple topping over hot slices of french toast.
This recipe is from Tammy’s Recipes.
Cream Cheese Butterhorns
A flaky crescent pastry with a cinnamon and cream cheese filling and icing glaze
Yield:
36 small pastries
Ingredients:
2 cups sifted flour 1/4 teaspoon salt 2/3 cup cold butter 1 egg, lightly beaten 3/4 cup sour cream or plain yogurt 8 ounces cream cheese 1/2 cup powdered (confectioner’s) sugar 1 teaspoon ground cinnamon
Icing Ingredients:
1 cup powdered sugar 1 tablespoon hot water 1/2 teaspoon vanilla
Instructions:
1. In mixing bowl, combine flour and salt. Cut in butter, until pea-sized lumps remain. Stir in egg and sour cream or yogurt just until mixed. Dough may still have some small butter lumps in it. Wrap dough in plastic wrap and chill.
2. With an electric mixer on high, beat cream cheese, powdered sugar, and cinnamon until well-combined.
3. Divide dough into three parts. On a lightly floured surface, roll each part into a 12 to 16-inch circle. Cut circle into 12 wedges. (I use a pizza cutter for this.)
4. Put a small amount (about a teaspoon or so) of cream cheese mixture at the wide edge of each wedge. Then roll each wedge, starting at the wide edge and ending at the point.
5. Place butterhorns point-side down on a lightly greased baking sheet. Bake at 375 degrees for 20-25 minutes, until lightly browned and fully cooked.
6. While butterhorns are baking, mix icing ingredients in a small bowl, until smooth. When butterhorns are finished baking, remove to a cooling rack and use a fork to drizzle icing over hot pastries.