How To Make Gyro Meat

By Gage Hanson

Gyro meat is delicious. The traditional Greek meat is often made with pork in Greece, but here in America is made out of a lamb-beef mixture. Either way, the seasoned meat, coupled with traditional tzatziki sauce and pita wrap, is delicious, but hard to find in small towns across the country. While you can find gyro restaurants in big cities, it is much harder to get a hold of gyro meat in smaller locales.

Gyro Meat
Gyro Meat

However, it isn’t too difficult to make your own gyro meat. Follow this recipe to find out how to make gyro meat. You’ll have a professional looking Greek gyro wrap in no time. 

            Ingredients:

            1 lb of ground beef

            1 lb of ground lamb

            2 cloves of garlic

            1 large onion

            1 tablespoon of marjoram

            1 tablespoon of oregano

            1 tablespoon of cumin

            1 tablespoon of thyme

            ½ tablespoon of black pepper

            2 teaspoons of kosher salt

Steps:

  1. The first thing you are going to want to do is to grind the beef and lamb together into a fine mixture. The meat is often put into a blender or food processor to turn the meat into a paste-like mixture. This will help the two meats mix together, let you integrate the gyro seasoning into the mix, and give you the ability to form the meat into the thin slices that gyros are known for.
  2. Mix all of the ingredients into the meat. To make authentic homemade gyro meat, you have to get the flavor right. Hopefully you have a fine paste of beef and lamb mixture that is easy to mix with the spices. If you used a food processor or blender, you can add the onion and garlic cloves into the mixture and use the processor to mix everything together. If not, you will want to chop and mash the onions and garlic so they will be easy to mix in without any noticeable chunks.
  3. Let the meat and gyro seasoning chill in the fridge for at least an hour in the bowl.
  4. Cooking the meat will remind you of cooking meatloaf, but this gyro meat recipe will be miles above the meatloaf you remember from dinner at grandma’s. You will want to get a loaf baking dish to spread the gyro meat out in. A 7×4 dish is the standard, but anything that fits your meat in a rectangular pattern will work.
  5. You will want to bake the meat at 325 degrees Fahrenheit for about an hour to an hour and fifteen minutes. Make sure the meat has reached 165 degrees on the inside.
  6. Remove the loaf and wrap it in tin foil and place it on a cooling rack. Place a pan on top of the loaf, or anything to weigh it down. This will help the meat become denser and get the desired gyro meat consistency.
  7. Cut the meat into thin slices and you are ready to add your tzatziki sauce, pita bread, and other serving options.

Tzatziki Sauce

A key part of any gyro meat recipe is the tzatziki sauce. It is easy to make and will take your homemade gyros to the next level.

            Ingredients:

            Half of a cucumber

            1 ½ cups of greek yogurt

            2 cloves of minced garlic

            2 tablespoons of olive oil

            1 tablespoon of white vinegar

            ½ teaspoon of salt

            1 tablespoon of minced fresh dill

Steps:

  1. Grate the cucumber and let it drain in a strainer overnight.
  2. Combine the yogurt, garlic, olive oil, white vinegar and salt. Let the mixture refrigerate overnight.
  3. Add the cucumber and fresh dill to the yogurt mixture.
  4. You are done! Add the tzatziki sauce to the gyro meat and enjoy.

Tips and tricks for your homemade gyro meat

Learning how to make gyro meat isn’t the only piece of the puzzle in your search for an authentic Greek meal. There are a few other steps to completing and amplifying the dish.

Gyros
Gyros
  • Puree the onion, garlic and herb mix before adding it to your gyro meat. This will help even out the gyro seasoning distribution.
  • Serve your gyros in a piece of pita that has been lightly grilled, and add sliced tomatoes, minced onions and lettuce. Some people will also add ketchup or mustard to their wrap. Include a side of french fries and your meal is complete.
  • A more traditional method of cooking includes grilling the meat on a rotisserie skewer. This is a more difficult option, but will cook the meat more evenly and add a good texture to it. You will want to leave the mixture in the refrigerator overnight so you are able to form it in rolls easier. Then you will grill the meat on medium-high until the internal temperature reaches 165.
  • Use your gyro meat to make gyro nachos. Instead of a pita wrap, combine your ingredients, including the tzatziki sauce, on top of a plate of chips. It is a great way to make a snack for game night or just a good, crunchy alternative to classic gyros.

If you enjoyed this recipe, be sure to browse through our other recipes.


Hiking Gear for Plus-sized hikers

Do you love the outdoors and spending time hiking but have trouble finding gear to fit your larger frame? This guide is for you! This is a comprehensive list of Hiking Gear for Plus-sized hikers. Whether you are 300, 350 or 400lbs, I hope this list will help you find the gear that you need to get out there and enjoy nature. We have several guides for larger people so in addition to hiking gear, be sure to check out our ebike’s for heavy/overweight riders guide as another way to get outdoors!

Whenever possible, I try to link to gear that is NOT made in China to try and keep quality up.

Hiking gear needed for larger hikers

Most hiking gear does not need to be specialized for larger obese or heavy hikers. For example, you don’t need a special canteen or hydration system just because you’re a larger plus sized hiker. This guide focuses on equipment like clothing, backpacks, chairs, etc.

Hiking boots for plus-size hikers

Many larger people have wide feet or calfs and it can be tricky to find good hiking boots that accommodate plus-size hikers. Here are some hiking boots for people with wide feet or calfs.

Danner Crag Rat Boot

Danner Boots

Danner Boots are Made in the U.S.A and are a high quality choice for hikers. They are built solid and will handle the roughest terrain. Some of the best options include the Danner Crag Rat (pictured), the Mountain Light and the Light II but they have many different styles to choose from with wide widths for both men and women.

KEEN Durand II
The KEEN Durand II boot is available in wide widths

KEEN Boots

KEEN is another American shoe manufacturer that makes several wide width hiking boots. These boots feature a rugged design that will give your foot and ankle the support they need regardless of the terrain that you may traverse. KEEN options include the Durand II (pictured).

Chippewa Modoc boot
The Chippewa Modoc Boot

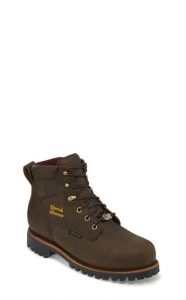
Chippewa Modoc

The Chippewa Modoc is made in the U.S.A. This sturdy boot comes in wide widths and provides a sturdy base for any plus-sized hiker. This classic hiking boot provides comfort and great classic looks for larger hikers needing a wide width booth.

Performance Clothing for larger hikers

In addition to footwear, it can sometimes be hard to find plus-size clothing for better performance when out in nature. Performance gear can help keep you warm and cool so you can keep going further. The following companies sell larger sizes for plus-sized outdoor enthusiasts.

The North Face

The North Face is one of the most iconic outdoor performance clothing brands. The company started out as a supplier of clothing for elite expeditions and the quality of their products was sought after around the world. Today the company supplies everything from jackets, pants and other accessories. The North Face has what it calls “extended sizes” for big and tall outdoor enthusiasts. Some items have sizes up to 4XL which will fit customers up to 400lbs.

The North Face’s Resolve jacket is available in extended sizes

The Resolve jacket is among The North Face’s offerings in jackets that provide protection from the weather and are available in extended sizes for plus size hikers and outdoor enthusiasts.

The North Face Arrowood Jacket

For colder weather, The North Face offers the Arrowood jacket in extended sizes. This one is only available up to 3XL which will cover most larger hikers or outdoor enthusiasts. It comes with a waterproof shell and an inside fleece component sure to keep you warm.

The North Face also has their 90s style Nuptse down jacket and Denali fleece jacket available for plus-size outdoor enthusiasts.

Columbia

Columbia has a complete line-up of clothing and footwear for larger individuals. Many of it is imported but sizes range up to 5XLT so plus sized outdoor enthusiasts looking to take a hike will find something to keep them warm or cool. Here is some of the performance gear that Columbia has for larger hikers and outdoor enthusiasts.

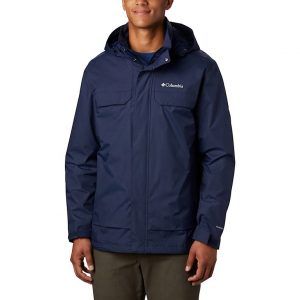
The Columbia Tryon Trail Shell

The Columbia Tryon Trail shell jacket is available in sizes up to 5XLT so it will fit the largest plus size hiker. The jacket can be layered to provide a warmer substitute in the colder months.

You can pair the jacket with a rain pant (also available up to size 5XL) and stay dry while you out out in the outdoors.

Columbia Basin Trail Full Fleece

Another option to pair the shell with or to wear it on its own is a fleece jacket. The Basin Trail Full Fleece is such a choice and is available in sizes up to 5XL.

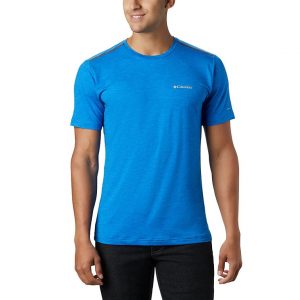
The Columbia Tech Trail Crew Neck

The Columbia Tech Trail Crew Neck is designed to wick moisture away from your skin and keep you cooler going down the trail. It also provides UV and sunscreen protection. It can be warn as a base layer or your main shirt when going for a hike. It’s available in sizes up to 6XL.

Columbia Silver Ridge II Stretch Pant
The Columbia Silver Ridge II Stretch Pant

The Columbia Silver Ridge II Stretch Pant is another performance layer to add to your outdoor gear arsenal. Like the shirt above, it provides UV and sunscreen protection. Articulated knees provide for flexibility and comfort. They are available in sizes up to a 54 waist.

Mountain Warehouse

Mountain Warehouse is another brand that carries outdoor gear for plus-size or larger hikers. They provide lots of performance wear options at very reasonable prices. While a lot of their offerings are imported, they are worth a look based on their low cost.

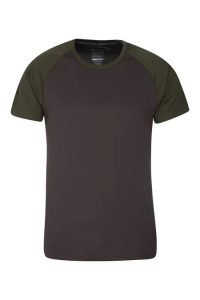
Mountain Warehouse Endurance T-Shirt

The Mountain Warehouse Endurance T-shirt provides UV and SPF protection as well as helping keep you dry and cool thanks to their Isocool technology. By wicking sweat away from your body it helps keep you cool so you can stay out longer.

Brisk Extreme Mens Waterproof Jacket

In addition to performance wear, Mountain Warehouse sells outer wear for plus-size hikers such as the Brisk Extreme Mens Waterproof Jacket. This jacket is fully breathable and features pit zips for extra ventilation where it counts if you know what I mean! It is available up to size 4XL.

The Mountain Warehouse Idris Full zip Fleece Jacket

An interesting addition to the outerwear options mentioned here, Mountain Warehouse has a line of full zip fleece jackets such as the Idris full zip fleece jacket. It’s available in sizes up to 4XL and is lightweight and breathable to make your journey down the trail more comfortable.

Performance Gear for Plus-size Hikers

We’ve covered footwear and performance clothing for larger hikers but what about gear? While larger hikers don’t need larger canteens or cookware, it is helpful to have backpacks, trekking poles and potentially sleeping bags designed for larger outdoor enthusiasts. Here are some suggestions for specialized gear for hiking for plus-sized hikers.

TrailBuddy Trekking Poles

For trekking poles I can’t recommend the TrailBuddy Trekking Poles enough. These lightweight poles are made of aluminum and will give you the support you need and help save wear and tear on your knees. An alternative would be the Foxelli Carbon Fiber Trekking Poles.

Teton Sports Explorer 4000 backpack for larger hikers.
Teton Sports Explorer 4000

Being properly equipped for a longer hike means having the equipment that will keep you safe. Ergonomics is important and having a properly fitting backpack is just as important as having a good pair of boots. This means having a too small backpack can also affect your balance and body’s musculoskeletal system. One larger backpack models include the Teton Sports Explorer 4000 which has a waist belt that fits up to 72″ and fits torsos up to 23″ so taller and larger backpackers.

Teton Sports XXL Sleeping Bag

Most hikers also like to camp in the back country at some point so it’s important to have the proper gear with you for shelter and warmth. While plus-size hikers don’t need a larger tent, having a larger sleeping bag is helpful to most of us to stay warm. Most sleeping bags for backpacking are made smaller and lighter but there are a few that are made wider and taller and for larger hikers. These include the Teton Sports XXL Sleeping Bag which will keep you warm down to 0 degrees. The bag is nearly 40″ wide which provide comfort to largest backpacker.

Conclusion

I hope this guide has helped plus-size hikers and outdoor enthusiasts find the gear that they are looking for or at least some direction on what to look for – Hiking Gear for Plus-sized hikers. This guide is part of a series of guides for larger or overweight persons looking for gear to get out and enjoy nature. Guides include eBikes for Heavier/Overweight Riders and RV’s for Larger People. If you have anything that you thing we should include in this guide, please email me at dbroer@lincon.com for consideration.


How to Make Cob Smoked Bacon

If you’ve ever had corn cob smoked bacon you know that it has the best flavor. It’s the old fashioned way of smoking bacon and it’s unfortunate that few places produce cob smoked bacon. The purpose of this Guide is help people that are looking to make their own cob smoked bacon at home. If you’re searching for how to make cob smoked bacon at home, it’s easier than you would think.

Equipment you will need

In order to smoke your own bacon you need a few things but once you have them, you will have them and be able to produce bacon when ever you need it. The equipment you will need includes:

  • A smoker
  • Amaze’n Pellet burner
  • 8-10″ Cast iron pan
  • Corn cob pellets
  • Pork Belly
  • Kosher Salt
  • Granulated Maple Sugar
  • Real Maple Syrup
  • Closable bag(s)

The Smoker

Unless you already have one, you’ll need a smoking apparatus to smoke your bacon. There are many options but I recommend the Masterbuilt MPS 230S. It’s a relatively inexpensive unit that gives you plenty of room for expansion and is a smoker that will work for people with different abilities so if you’re a novice, this is a smoker that can grow with you.

A-Maze-N Pellet Burner

Unless your smoker is specifically designed for burning pellets, you’ll need an A-Maze-N pellet burner that will produce a cold smoke from wood pellets. They have tubes and mazes that allow you to put your pellets in and produce smoke to smoke your meats. The 5×8 Maze will produce smoke for up to 9 hours so if you’re looking for a long burning time, that would be your choice.

To avoid the maze pellet burner sitting directly on top of the burner, you can place it in a 8-10″ cast iron pan.

Corn Cob Pellets

Of course if you’re trying to smoke something with corn cobs, you need the corn cobs to do the actual smoking. You can use dried corn cobs that will burn slowly but probably the easiest way is to use corn cob pellets. The key is finding pure ones. Cob smoking is not widely done so there are no retailers selling corn cob pellets for smoking meats but there are retailers who sell corn cob pellets for other purposes. The purest one that I know of believe it or not is sold as “horse bedding” at Tractor Supply. Their Best Cob Premium Horse Bedding is 100% corn cobs and are used by many smokers to smoke their meats with corn cobs. This would probably be your best alternative if you do not have dried corn cobs to burn.

Pork Bellies

Bacon is produced from Pork Bellies. Pork Bellies are the under belly meat of a pig and when you purchase one you get about 12-15 pounds of bacon at a cost of about $3-4/lb. When you consider that cob smoked bacon can sell for $8-20/lb, you’re saving a lot by making your own. We’ll talk more in a minute on how to prepare your pork belly for smoking it into bacon. To locate a pork belly, start calling around to local meat markets or butchers and ask for a Pork Belly. They will know what you’re talking about and can tell you what they have. If available, see if they have ones without the the skin. It will save you time later!

Prepping your Pork Belly

Now that you have all the “hardware” to make your cob smoked bacon, you need to prep the pork belly and cure it for smoking. Many people will recommend curing with nitrates or pink salt or something like that but that is totally unnecessary. The process takes about a week to prep your bacon so keep that in mind.

If your pork belly still has the skin on, you want to remove that so that the smoke can penetrate the meat. Use a filet knife or something similar and slice that off so you just have the meat. Leaving a little fat is OK but you want it mostly off.

In a small bowl combine together:

  • 1/4 Cup Kosher Salt
  • 1/4 Cup Granulated Maple Sugar (you can also use brown sugar)
  • 1/4 Real Maple Syrup (not the artificial stuff!)

Take this mixture and spread out on both sides of the pork belly. Carefully slide the pork belly into a gallon-sized zip-lock type bag and place it in your refrigerator.

Once a day for 7 days, flip over the bag with your pork belly.

On the 8th day, rinse off the pork belly and place it on a drying rack in your refrigerator and leave it overnight to dry.

Finally, How to Make Cob Smoked Bacon!

To smoke the bacon we are going to cold smoke the bacon which means we want smoke flowing over the meat for about 4 hours and a temperature between 75 and 90 degrees. Under most circumstances you won’t need to ignite your burner in your smoker unless it is very cold outside. The heat generated by the pellet maze should be enough to keep the temperature around 80 inside the smoker.

Start by putting the corn cob into your pellet maze and then using butane or strong flame in the igniter hole on both ends, light the pellets. This might take a minute or two and you should see a small flame on the pellets. Let the pellets burn for several minutes before gently putting the flame out. Smoke should roll off of the pellets and the maze should be ready to go.

You can either lay the pork belly flat on a rack near the top of the smoker or hang it from a bacon hanger. If you lay it flat, you’ll need to flip the bacon over about two hours into the smoking process. The bacon needs to be smoked for a total of four hours. I recommend a ThermalPro TP-17 dual probe thermometer which would allow you to accurately monitor the interior temperature of your smoker as well as the temperature of the bacon to complete the smoking process.

At the end of the four hours of smoking you want to put your burner on low and keep the internal temperature below 180 degrees and monitor the temperature of the bacon until it reaches 140 degrees. This should take about an hour.

Once the bacon reaches 140 degrees you can remove it from the smoker. Place the meat in a refrigerator and allow it to cool completely before slicing for best results. Cooling the meat makes it easier to slice but you can also slice it off the smoker if you just can’t wait. 😉

It’s a long process but in the end I think you will find this to be the best tasting bacon that you’ve ever had!


Powerful Air Conditioners for Small Windows

Do you have a small window opening but need a powerful or large capacity air conditioner to cool a large space? This is a list of powerful air conditioners for small windows that will help you cool that space. Air conditioners that made this list are no wider than 30″ and no higher than 17″ and have more than 10,000 BTU capacity. This list is part of our Guides to help people.

Use the arrows to sort by the specification you need to find an air conditioner that will provide the BTU’s you need to cool your space.

[table id=1 /]


A newbies guide to fishing

I have a son who has taken an interest in fishing. I haven’t gone fishing years and so there was a slight learning curve and I decided to write a newbies guide to fishing for anyone else who might be interesting going fishing but aren’t really sure where to begin.

Fishing basics

Fishing can be a great time!

Fishing is a great and relaxing past time. Some people fish for food, some fish for sport and others just to relax. Fishing is the act of trying to catch a fish.

There are different tools used to fish but basically you put something out that attracts a fish and try to entice the fish to take it. You then capture the fish and bring it to you.

The fishing rod

In essence, a fishing rod is a tool just like any other tool in your tool box but the most important tool is your mind. While the rod is the tool to present your bait to the fish and bring the fish to you, it is your mind that determines what and how you do that. Since this is a newbies guide to fishing, we will just focus on a few of those tricks.

All fishing rods basically do the same thing. They allow you to cast a line out to where the fish are and present your bait to the fish. There are some subtle differences between types of rods.

Spincast Reel

A Spincast reel.

A spincast rod & reel features a closed reel to avoid tangling of the line. It also features a way to adjust the drag on the line.

To use a spincast reel, you put your bait on, hold the brake button down, bring the rod back – either overhead or to your side and then quickly flick it towards the water and release the brake. After your bait lands, turn the crank a few times to lock the reel.

Spinning Reel

A Spinning Reel

A spinning reel has an open reel of of fishing line with a bail around it. The the bail keeps the line away from the reel so the line wraps smoothly as you crank the reel.

To use a spinning reel you take the line and put it through one of your fingers holding the rod. Flip the bail over and bring the rod back – either overhead or to your side and then quickly flick it towards the water. The line should go out. After it goes out, manually flip the bail back again so you are ready to reel your fish in.

Fly Fishing

Fly Fishing Rod setup

A Fly Fishing reel is different from the spinning forms of fishing in that you place a lightweight lure (the bait) that is shaped like bug that a fish would see above the water and present it to the fish. This requires and almost delicate dance of the fishing line before allowing the fly to land gently on the water.

While the main focus of this newbie guide for fishing is on the spinning and spincast reels, to fly fish you need a special rod/reel and setup to the line. To start you pull out about 3′ of line from the reel and hold it in your opposite hand. Pull your rod back and then flick it forward allowing the line to go out. You pull the rod backwards and pull another 3′ or so of line out and swing the rod forward again. You do this back and forth repeatedly until you have enough line have the fly land exactly where you want it to. When you do, you just let the line land on the water and start reeling it in.

Obviously these are a lot of subtle things to learn and have for fly fishing but I thought I would include the description here as part of the newbies guide to fishing but this is a more advanced topic to cover once you have mastered the other fishing techniques.

Bait

You won’t catch many fish with a bare fishing line so you need to attach some bait to the end of your line. Bait comes in different sizes and types depending on what you are trying to catch.

For our purposes, we’ll focus on two basic types of fish – bass and trout. Bass are found in lakes or larger bodies of water and trout are found in streams. What you use to catch each one depends of which you are trying to catch.

Bass

A Bass Lure

If you are fishing on a lake and trying to catch a bass fish, you are most likely going to use a lure that is shaped like a small fish. The bass will think it’s a fish and go to bite it. That’s when you can hook them!

To attach the lure, you’ll want to attach a swivel to the end of your line to connect the lure to the line. About 12-16″ above the swivel you’ll want a bobber so that your bait will dangle that distance below the bobber.

Trout

A Mepps Lure is a great tool for catching trout.

Trout are naturally curious fish and like shinny objects or food that appears to have fallen into the water like worms. For trout you can use a spinning shiner.

To attach the lure, you’ll want to attach a swivel to the end of your line to connect the lure to the line. About 12-16″ above the swivel you’ll want a bobber so that your bait will dangle that distance below the bobber.

A note about barbed hooks

Some hooks have a barbed hooked and in some jurisdictions they are illegal. If you have barbed hooks, you can always get a small wire cutter and just cut the tip of the barb off and your hook will be legal.

Where to find fish for newbies

You want to look in shady spots and behind rocks to find trout.

Fish like to hang out in the shade where the water is cooler. Look for shady spots or places that are not in direct sunlight.

In a stream, you want to stand looking downstream and find a dark pocket around a rock, under a tree or roots hanging over the stream bank. Fish will go to these areas. That is where you want to try and cast your line and then bring it towards you.

Concluding thoughts on fishing for beginners

Hopefully this newbies guide to fishing helps you on your journey to becoming a fisherman. There are other resources online such as:


How to re-light an oil burner furnace

If you’ve ever been in a situation where you run out of heating oil, you know that someone needs to re-light your furnace. This can cost over a hundred dollars or more if you have a technician do this. This guide will walk you through the simple process of re-lighting your oil burner.

What you need

To relight your furnace you will need:

  • Some diesel fuel (in place of heating oil)
  • A wrench (size may vary)
  • Collection container

Getting Started

First, you should know that if it’s after hours or the weekend that most if not all oil dealers will charge extra fees to deliver oil and will also charge extra to re-light your furnace. You should know that you can use ordinary diesel fuel from any service station. It’s more expensive per gallon but it’s cheaper than having the service deliver off hours. You’ll need about 2-3 gallons per day to heat a standard house on a cold day. You’ll use less if it’s warmer. The station will sell a 5 gallon container for diesel and you can use that to have 2-3 days of supply and save on fees.

Re-lighting your burner

After you’ve added the diesel, you need to clear the fuel line of air. To do this, you need put your collection container below the burner. Locate the air release valve – it will have a screw that will open with a wrench. It will be at the end of the fuel line from your oil tank.

The air release valve is to the right of the fuel line entering the burner

Open the valve. Then press the red re-light button. You’ll hear the pump start. Wait for the oil/diesel to start coming out of the valve and then close it (turning it the opposite way you did to open it).

The red re-light button looks like this

If the burner does not light when you close the valve, you may need to press the re-light button again.

The key is to have the pump suck the diesel/oil you’ve put in the tank to the oil burner. Opening the valve breaks the vacuum in the line and once fuel starts coming out of the air release valve, closing it will allow just fuel to make it to the burner.

Good luck and enjoy the savings!


How to Homeschool

Use the guides below to help with homeschooling:


Simple Budgeting

Creating a Budgeting | Household Expenses | Debt Payments | Travel Budgeting

As a single income family, I’m often asked how we make ends meet. It must surprise people that we can get by on a single income but it’s not that difficult with a few tips and tricks which I hope to share with you in this guide. I know that there are lots of books on this subject but many are written by someone who really doesn’t have to live month-to-month. I can offer real-world experience and examples and you’ll find many in this guide.

I’ll cover a number of different areas like how to potentially increase your take home pay without asking for a raise, how to put aside some money without even realizing it and how to cut your bills and increase your quality of life at the same time. We’ve done a good job of mitigating our expenses so our monthly non-debt related expenses are under $700 a month. If you add in a mortgage and care payment, our total expenses are just over $2000 a month. This gives us a nice cushion to work with and a way to be able to pay for things when they pop-up (and they always do!).

Lots of times we go through life and just accept how we do things until someone suggests a different way and I’m hoping that my approach will be simpler and allow you to have more money left over in your pocket each month and help you plan so when an unexpected or one of those periodic bills comes along, you don’t have to figure out a way to pay that and your regular bills at the same time. These are just suggestions and examples and you’re welcome to take what you want and ignore the rest.

There are two sides to having a balanced budget – income and expenses. I’ll cover both sides as we walk from your paycheck through your monthly expenses.

One word of caution. I am not a financial expert and I am only sharing real world experience so you should consult with friends or other people that you deem to be experts in a field if something doesn’t seem right to you. What works for me might not work for you but the general advice is sound and I hope you benefit from some of the ideas contained in this book.

Creating a Budgeting | Household Expenses | Debt Payments | Travel Budgeting


Sharing Family Memories

Do you have old home movies and family pictures that are just sitting in a closet? Would you like to share these precious memories with everyone in your family and future generations? Sharing family memories can seem like a daunting task but modern technology can be a simple thing.

There are lots of online services that will convert your old 8mm home movies to DVD or a hard drive with a video file. These services can help restore and improve the quality and take the media from an older generation to a more current one and allow them to be viewable for generations to come.

So now you have a nice hard drive or DVD and you can view your families memories but how do you share these memories with family memories who live all over the country and the world? That’s what this guide is for. We will guide you through the process of sharing family memories with family members who live in different places.

Converting Video Files | Creating an online photo gallery | Sharing Video Files


Cutting the cord

This is a new section on LincOn and hope this guide/information will be helpful to folks who are looking to cut the cable cord and joining the millions who have expanded (not limited!) their viewing choices.

Cutting the cord should not be a daunting task or that complicated. In this space we will discuss what cutting the cord is, how to continue to view all of the programs that you are used to watching and more. This guide will focus on using a tool called Plex to cut the cord.

Introduction | What is Plex? | Configuring Plex | Adding content to Plex | Advanced Stuff

Introduction

Are you one the millions of people that have noticed your
high cable bill and are finally cutting the cord?  If so, this book is for you.  I cut the cord nearly 10 years ago and haven’t
looked back.  In that time I’ve saved
nearly $10,000 and given myself more programming options than I could have
imagined.  How do I get more with less
you ask?  That’s what this book is all
about.

I do a lot of “techie” things with my cord cutting but the
core of what I do is utilize tools that are currently available and make them
work for me.  I’ll leave a lot of the
technical stuff and focus on a step by step guide to cutting the cord in 2019
and how to use Plex as a tool to do do so.

Please Note: Plex, the Plex Play logo and Plex Media Server are
trademarks of Plex.  The author is NOT
associated with Plex in any way other than being a user and sharing information
about how to cut the cord and use Plex in the process.

You might be asking – what is Plex?  Plex is software that is a free download that
will run on a number of platforms.  It
can take all of your local media – CD’s, DVD’s (TV Shows or Movies), Photos and
much, much more and organize it in a way that you can use your TV to browse
through all of this content, just like you do with other services.

Plex is just the tool that will organize everything but
you’ll need some other tools to feed that content to Plex like a tuner and
services that extend the tuner beyond local stations to record programs.  You’ll make use of utilities that will remove
commercials from aucasinosonline your recordings and others that will allow you to copy your
DVD’s or any DVD’s like DVD’s of TV shows that you can’t find.  We’ll even show you other tools that will
allow you to copy your music CD’s or scan pictures and make those libraries
available on Plex.

This guide will take you through the process of what steps you’ll need to take before you cut the cord and what you can do to still enjoy the programming that you used to watching or listening too.  It does take a little bit of work but the final result is all the savings that you will enjoy and all the additional programming that you will add and be available to you regardless of whether your Internet is up and you’ll have programming when everyone else does not.