How to sharpen a pocket knife

A pocket knife is a useful tool to carry around. However, what happens when your pocket knife becomes dull? This guide will give you some tricks and tips on ow to sharpen a pocket knife.

Pocket knives have been carried for centuries. The oldest known knives go back to around 200 BC. Over the years the knife has improved and the modern pocket knife started to emerge around the year 800. That’s a long history and in that time people have developed techniques to sharpen and hone the knife edge to make it sharper so that it will cut easier. The sharper the blade the safer it is. A dull knife if more prone to cause an accident because you will use more force and it can slip and cut you.

A pocket knife and a sharpening stone

Types of Pocket Knives

There are many different types of pocket knives and believe it or not, they all have names. All pocket knives fold to protect the blade and the user. How they fold and what they consist are what make them different or carry their makers name.

Kershaw Classic Slipjoint Pocket Knife

Slip Joint Knife

The slip joint knife is one of the earliest pocket knives. It features a built in spring mechanism that holds the blade in place.

Victornox Swiss Army Knife

Camper Knife

A Camper Knife is a pocket knife that contains multiple blades and functions. A Swiss Army knife is probably one of the best examples of camper knife.
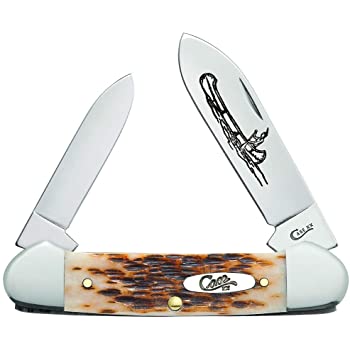
Canoe Knife

Canoe Knife

A Canoe Knife is a knife that is shaped like a canoe and usually contains two blades.

Penknife

A Penknife is the British term for a camp knife. It typically has two blades, one of which is a pen blade for sharpening a quill for writing.

Locking Blade Knife

A locking blade knife is essentially a fixed blade knife that folds and fits in your pocket. The modern original locking blade knife was the Buck 110 folding knife.

Ways to sharpen a pocket knife

The first step to sharping a knife is finding a good sharping stone such as Smith’s SK2 2-Stone Sharpening Kit. The stone will remove a microscopic layer of metal creating a sharper edge which is what you are looking for. There are other methods such as pull through sharpeners but as we will see, they do not do as good a job as a sharpening stone.

CAUTION – USE CAUTION WHEN USING ANY KNIFE BLADE TO AVOID INJURY.
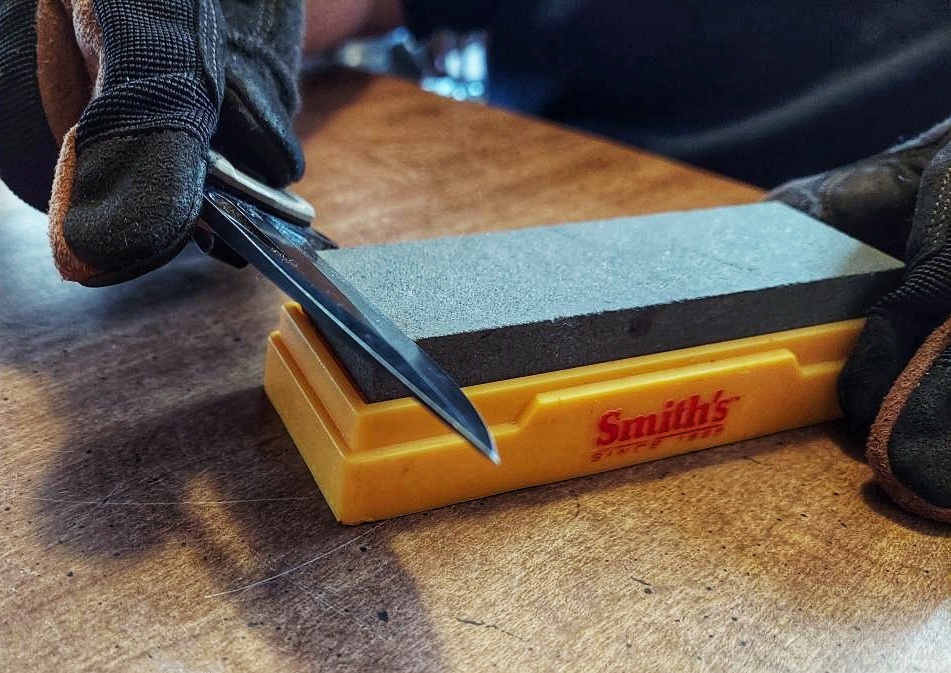
Sharpening stone

After you find a good stone, you will need to hold your knife at a 25 degree angle or a little less give or take. Some stones will come with a guide to show you what 25 degrees is. You then firmly press the knife to the stone at a 25 degree angle – the back of the knife should be on the stone but the tip will be not be. Slide the knife down the stone and pull so at the end of the stone the front of the knife will sliding off and will be sharpened as well. Depending on how dull your knife is and how much damage is on the knife you may have to repeat this for 10-20 (maybe even 30!) times. You will want to do this on both sides.

Sharpening a knife - notice the angle and how the tip is off the stone
Sharpening a knife – notice the angle and how the tip is off the stone
Here's a pocket knife being sharpened.  This is repeated on both sides.
Here’s a pocket knife being sharpened. This is repeated on both sides.

Pull through sharpener

Because each blade has a unique profile and a pull through sharpener has a fixed angle, they are not always the best choice for sharpening a pocket knife. For this reason we highly recommend using a sharpening stone.

Some Recommendations

Now that we know how to sharpen a pocket knife, here are some recommendations for a few different knives & safety gear from a long time knife enthusiast.

Knives

  • Morakniv Companion Fixed Blade Outdoor Knife – This is a good all around everyday knife for use and abuse.
  • Gerber Gear 22-48485 Paraframe Mini Pocket Knife – This is a great beginners pocket knife, complete with a lock blade.

Safety Gear

  • HANDLANDY Mens Work Gloves – These gloves are cut resistant and will keep you moderately safe while sharpening your knife.
  • UVEX by Honeywell S3200 Genesis Safety Glasses – Safety glasses are always recommended. You never know when something could fly up and hit you in the eye!

Conclusion

Knives are incredibly handy tools to have every day. Pocket knives make for a convenient way to always have a knife with you. Any blade, regardless of price, will dull over time and hopefully, this guide will help you learn how to sharpen your pocket knife and extend the life and usefulness of your blade.


Non-Alcoholic Beer

Beer is one of the oldest beverages in the world. It was one of the main sources of water before water purification was made available. The presence of alcohol killed bacteria or inhibited its growth. In modern times though, there are many reasons why someone might want to enjoy a beer without alcohol. Please enjoy Guide to non-alcoholic beer, how it’s made along with a list of some of the best non-alcoholic beers available. Some of beers available online without even having to go to a store!

Non-alcoholic beers like Brooklyn Breweries Special effects IPA are just as good any beer
Non-alcoholic beers like Brooklyn Breweries Special effects IPA are just as good any beer.

What is non-alcoholic beer?

Intoxicating beverages were defined by the Volstead Act as having less than 0.5% Alcohol By Volume or ABV. The Volstead Act is what propelled the United States into Prohibition which prohibited the production of alcohol for consumption. Beer with less than 0.5% ABV is considered non-alcoholic. Some non-alcoholic beers have 0.0% ABV contents.

Can under-21 drink non-alcoholic beer?

This depends on the jurisdiction. In some countries it is yes and in others yes. Here in the U.S. it depends on what state you are in. The following states do not restrict the sale of non-alcoholic beer containing less than 0.5% ABV:

  • Alaska
  • The District of Columbia
  • Hawaii
  • Illinois
  • Minnesota
  • New Jersey
  • Texas
  • Wisconsin

How is beer brewed without alcohol?

There are two main methods to remove alcohol from beer – vacuum and reverse osmosis. Both methods have been refined in recent years to produce beers that are just as good as their alcohol containing companions.

Vacuum Removal of Alcohol

Originally alcohol was removed from beer by boiling it to remove the alcohol. This left most beers with a watery flavor. In recent years though, brewers take advantage of the fact that alcohol boils at a lower temperature than water and even lower under vacuum. Beer is placed under a vacuum and very little heat is applied causing the alcohol to boil off at nearly room temperature. This leaves the beer with all its flavor intact.

Reverse Osmosis Removal

Another method for removing alcohol from beer is to filter the beer through a reverse osmosis filter. The beer is pumped at a high pressure through a membrane that only allows a water & alcohol molecule to pass through it. The water is then boiled to release the alcohol. This can also be done under a vacuum to reduce the amount of heat that is needed. The alcohol-free water is then added back the beer concentrate to packaged from there.

The best alcohol-free beers

Alcohol-free beer has been rising in popularity over the past few years and there are now many different choices for those looking to enjoy a beer without the intoxicating effects. Many are also available to be shipped to home!

Hellraiser Dark Amber is our favorite non-alcoholic beer.
Hellraiser Dark Amber is our favorite non-alcoholic beer
  • All Out Extra Dark – Athletic Brewing – This is an award winning dark beer from a brewery that specializes in non-alcoholic brews. Also available online.
  • Hellraiser Dark Amber – Wellbeing Brewing – This is our favorite non-alcoholic beer. It tastes like a dark, rich beer. If you like the flavor of beer, trust us, this will deliver! It’s even available online.
  • Just the Haze – Samuel Adams – From the world famous brewery that started the microbrew boom. It’s a full flavored IPA beer that will satisfy.
  • Special Effects IPA – Brooklyn Brewery – If you’re looking for a lighter beer with a full beer flavor, this IPA will deliver!

Making Alcohol-Free beer at Home

Homebrewing is a popular way to make beer the way anyone prefers and this includes making the beer without alcohol. Non-alcoholic beer is made the same way as regular beer but will require an extra few steps to remove the alcohol.

Modern breweries use a reverse osmosis filter to separate the water with the alcohol and the concentrated beer. This water is then boiled under a vacuum to remove the alcohol. This process can also be done at home with a small reverse osmosis system and adding pure water to concentrate to avoid having to boil the water and alcohol.

The brewing process for any beer looks as follows:

  1. Malting – Barley is soaked in water allowing the grain to “sprout”. The sprouts are dried.
  2. Milling – Malted grain is ground to gritty consistency.
  3. Mashing – The ground malted grain is mixed with water and pulverized. The mix is then gradually heated to 75 °C (167 °F). The slurry is filtered to remove the majority of particulates. This filtered sugary liquid is called wort.
  4. Brewing – The wort is brought to a boil for roughly 1–2 hours.
  5. Cooling – The wort is filtered to remove the majority of the grains and hops and then immediately cooled.
  6. Fermenting – The wort is saturated with air, yeast is added in the fermentation tank. This step takes around ten days.
  7. Maturation – The freshly fermented and uncarbonated beer is placed into a conditioning tank and allowed to age.
  8. To remove the alcohol, the beer can be filtered through a reverse osmosis filter to remove the water along with the alcohol. Pure water can be added back to the concentrate.
  9. Finishing – The beer is filtered and then carbonated and moved into a storage tank for bottling or kegging.

Kits are available for anyone who wants to homebrew whether you are beginner wanting to try your hand at brewing or ready for something more advanced.

Athletic Brewing produces award winning non-alcoholic beers as good as any beer.

Conclusion

Beer is one of the oldest beverages in the world. In recent years the breadth and quality of beer available around the world has improved tremendously. This includes gluten-free beers as well as alcohol-free varieties. Do you have a favorite beer that are missing from our list? Be sure to contact us and let us know. We love hearing from people and making our guides the best available on the Internet.


Gluten-Free Beer

Beer is typically produced with wheat, barley and rye, all of which contain gluten. For those who live with Celiac Disease these are no-go ingredients than can cause major issue. Fortunately, for those with Celiac disease and enjoy a good beer, there are a number of gluten free beers that can satisfy their thirst. This Gluten Free Beer Guide should help you learn about what gluten free beer is, how it’s made and what are some top choices when it comes to buying a gluten free beer.

Holidaily Brewery is one of the few breweries that produces dedicated gluten-free beer.

Types of Gluten Free Beer

Just as with beer itself, there are several different varieties of beer that fall under the “gluten umbrella”. According to the Brewers Association, there are three categories of beer fall under this umbrella for those with gluten issues. They are Gluten-Reduced, Gluten-Free and Dedicated Gluten-Free beers. Here’s what each type means:

Gluten-Reduced Beer

A product cannot be labelled as gluten-free if it contains more than 20 parts per million of gluten. Since beer is brewed with barley, it contains gluten by its very nature. However, enzymes can be added that reduce the amount of gluten in the beer below the 20 parts per million. Brewers label these beers as “crafted to remove gluten”.

Gluten-Free Beer

A gluten-free beer is one that contains no gluten at all. They utilize ingredients like sorghum or rice syrup, buckwheat, millet and chestnuts to craft these types of beer. Because they contain no gluten that needs to be removed, they can be labelled as gluten-free beers. However, many (if not all) beers in this category are produced on the same equipment as other gluten containing beers. This introduces some risk for those at the highest risk of gluten allergies.

Dedicated Gluten-Free Beer

These beers have the lowest risk of containing any gluten because they are produced in facilities and equipment dedicated to being gluten-free and are not shared with any gluten containing beers.

Gluten Free Beer List

Seclusion IPA from New Planet Brewing

American Craft Brewers are second to none and produce the highest quality beers in the world. Thankfully this includes many gluten-free varieties including the follow.

Gluten-Reduced Beers

Gluten-Free Beer

Dedicated Gluten-Free Beers

The following breweries produce gluten-free beers in dedicated facilities and equipment:

Vanishing Point IPS from Ghostfish Brewing in Seattle is a dedicated gluten-free beer.
Vanishing Point IPA

Gluten-Free Beer at Home

Home brewing is another way to control the ingredients in a brew and allows you to ensure the taste and quality of what you produce. There are a number of kits that help facilitate brewing gluten-free beer at home:

Gluten-free homebrew kit.
A Home Brew Kit can be your ticket to a gluten-free beer


10 Phone Interview Tips That Will Land You A Second Interview

By Gage Hanson

            Nobody likes phone interviews. Not exactly a controversial statement, but one that needs to be said nonetheless. There is a prevailing idea that everyone has that everyone else is great at talking on the phone. It isn’t true. So, when you have to interview on the phone for a job, an increasingly common event, how do you do well? Well, here’s 10 phone interview tips that will land you a second interview.

10 Phone Interview Tips That Will Land You A Second Interview

1. Make Sure Everything Works

            This step is absolutely crucial. I can’t tell you the amount of times I’ve been on a skype chat, conference call, or digital meeting where I haven’t been able to pay attention because someone’s microphone is crackling or where someone had to ask “what did you say?” half a dozen times because their speaker was less than stellar.

            I recommend testing your phone by calling a friend the day of the interview to ensure that they can hear you well and you can hear them just as good. I also recommend keeping your phone charger nearby. If possible, use a microphone enabled pair of headphones. This will allow you to hear your interviewer clearly and higher quality headphones will have a microphone that is probably better than your phone’s. While not crucial, these will help the interview process go smoother.

2. Environment is Key

Do not do your interview outside or in a public place. Ever. You may think that a coffee shop is a good place to calm your nerves or a park is a quiet environment, but they have too many negatives to outweigh the positives.

            The slightest bit of wind will be heard by the interviewer and you may not even realize how much your questions are being cut out. Even in a public place inside you have no control over what sounds will be happening or how loud your environment gets. It is best to stay in a trusted environment indoors, most preferably your room or home.

Tips for second interviews - dress for success
Dressing to impress is important for second interviews

3. Dress to Impress, Really

I recommend that you wear the same exact outfit you would wear for your in-person interview. Don’t think that you can do your interview in nothing but your underwear. You can technically do it, but your mindset and confidence won’t nearly be the same. Dress your best and your interview skills will improve.

4. Prepare a Cheat Sheet

            One of the major benefits of over the phone interviews is the same exact benefit of an open book exam. You can have notes in front of you. You can pull up your resume to know what your best speaking points will be. This interview tip will be one of the biggest game changers in increasing your chances of landing a second interview.

            I suggest that you compile a note sheet of all your main talking points and the aspects of the company that excite you the most. These will all come in handy while you are talking. You won’t have to wait ten to fifteen seconds after every question to remember what you want to say. It would be a good idea to keep these notes to one page. Flipping through pages and pages of notes will be just as detrimental as not having any notes at all.

5. Slow and Simple

This tip works for in person interviews as well, but it is easier to fall into the problem it solves in phone interviews. People often speed up while talking on the phone. They get nervous, their heart speeds up, and they talk too fast. While interviewing in person you can pick up on clues and follow your interviewers pace easier, but you don’t get that benefit over the phone. So make sure to focus on your speed. You will feel like you are talking too slow, but that means you are speaking at exactly the right rate.

6. Active Listening

It is easy to start zoning out while you are interviewing on the phone. You can be distracted by what is going on around you, by something you see in your house, by a screen in front of you. Whatever it is, you have to divert your attention back to the interview. A good thing to do to ensure that your attention doesn’t wander is to try and form questions based on what your interviewer is saying. These questions will accomplish two things. You won’t be distracted and fumble through your interview, and your questions will impress your interviewer by showing interest and initiative.

7. Study Beforehand

While making your study sheet, you would also benefit from doing some studying. As much as you think your studying days are behind you now that you are searching for jobs, you are quite wrong. Studying common first interview questions and excellent answers to these questions and finding out more about the company you are interviewing for will make you stand out amongst all the applicants. Many applicants will stutter through generic answers. You can study and give specific, rock solid responses to impress your soon to be employer.

8. Practice makes Perfect

Another tip that works for regular interviews, this tip is doubly important when you have to talk on the phone. Lots of people practice what they are going to say before a regular phone call, so why shouldn’t you practice before a phone interview? It wouldn’t be out of the question for you to practice common interview questions over the phone with a close friend or family member.

second telephone interview tips.
Practice makes perfect when it comes to second interviews

9. Prepare Questions

While you are researching the company you are interviewing with, it would be wise to jot down a quick list of questions you think you could ask your interviewer about the job or company at the end of your interview. It is common to ask an applicant at the end of the interview if they have any questions. Simply saying “no” may come off as you not having any interest or deep desire to work in this position. Prepare 3-5 good questions that you could ask.

10. Check your Voicemail

The easiest of all these tips could also spare you the most embarrassment. I know a lot of people that haven’t changed their voicemail since they got their first phone in middle or high school. Imagine the voicemail you set up in high school being the first impression your interviewer gets if you somehow miss their call. Not the worst thing in the world, but also something you can easily avoid. Good luck.

This Guide ie one of our exclusive Guides. Checkout our other exclusive Guides found only here on LincOn.com.


Maple Sugar

Maple sugar is sweetener produced by maple trees. It’s the primary ingredient (along with water) in real maple syrup. Also known as granulated maple sugar it is produced by removing water from maple syrup till only the sugar crystals are left.

Maple sugar can be used as a sweetener anywhere that sugar is used but teaspoon for teaspoon it has fewer calories than cane sugar and it has a lower glycemic impact on the body. It can be purchased for baking and other uses or it can be made if you have the right equipment.

granulated maple sugar

Where does maple sugar come from?

As mentioned, maple sugar is produced by maple trees. The sugar is produced as the maple tree converts sunshine to sugar via photogenesis . The sugar is stored in the roots during the fall for use in jump starting leaf growth in the spring.

maple leaves on branches
Maple sugar comes from maple trees – it is produced in the leaves by photosynthesis

In the spring as the ground thaws, cold and warm temperature swings cause the sugary water called sap to rise to the maple trees branches to feed the budding leaves. This sap travels through the outer layer of the tree. Small holes are drilled into the outer bark and wood of the tree to capture a very small portion of this sugary water. The sap contains about 96-99% water. The rest is sugar!

The sap is then concentrated by removing excess water until there is only about 33% of the water left. This liquid is called maple syrup. It’s mostly sugar but the water makes it liquidy.

making maple syrup
Maple syrup is made up of maple sugar and water. The excess water is removed to make maple sugar,

To make granulated maple sugar, the syrup is then further boiled until the temperature is around 265° and then stirred until all the water is gone and only granulated maple sugar is left. It is further “refined” by sifting it and removing any large chunks that may have formed.

What is maple sugar made up of?

Maple sugar is one of the healthier natural sugars. It is a source of antioxidants and trace minerals like manganese, riboflavin, zinc, magnesium, calcium and potassium – all important minerals for health. This means that there are a lot of health benefits to maple sugar!

Where to buy it

Maple sugar is available at many stores but you’ll pay a premium for that. The cheapest option to is buy it online, direct from a producer. You get a lower price and more sugar so you can use it more frequently and you help a producer at the same time. The sugar you’ll buy in most grocery stores is from wholesale buyers who often pay producers the lowest price so buying direct helps them out.

If you need bulk quantities (10, 20 or more pounds), you can even buy that online with FREE SHIPPING! 20lbs sells for $175 and since it is a dry product it is shelf stable so you don’t need to worry about it expiring. See also our article Does maple syrup go bad?

How to make maple sugar

In addition to being purchased online, maple sugar can also be made relatively easily in your home if you have the right tools. To make maple sugar you will need a medium to large saucepan, a candy thermometer, wooden spoon or spatula and some maple syrup. Most maple syrup can be used but occasionally some very dark syrup will not granulate. It also helps to have a little canola oil to spray or add a few drops to knock down the foam that will inevitably appear. If you want to make more than quart at a time, you might want to consider using a stand mixer for the final step.

Start by pouring a quart of syrup in a medium saucepan. You can add more syrup into a larger saucepan but unless you are going to use a stand mixer, your arm might get tired. Heat the syrup on a low to medium heat. Allow the syrup to come to a boil. As it comes to a boil it will start to foam up – if it comes to a boil too fast it will foam over.

Tip – as it comes to a boil, add a few drops of canola oil. The foam will dissipate.

Allow the syrup to come to a solid boil. When it does, you can slowly increase the temperature and allow the syrup the boil faster. A faster boil will not burn the syrup. Watch for foam! If it foams over, add some canola drops or turn down your burner.

Once you have a solid, steady boil, monitor the temperature with a candy thermometer and wait for it to reach at least 260°. 265° is better because it will granulate faster. Once it reaches that temperature, pour it into a mixing bowl. Start stirring it by hand with a wooden spoon or start your stand mixer on low. Stir clockwise for about a minute and then counter clockwise for another. Alternate and then after about 5 minutes the mixer will get very hot and start to look like peanut butter. KEEP STIRRING. After another minutes the peanut butter like mixture will become powdery. The harder you stir at this point, the looser your sugar will become.

stirring maple syrup to make maple sugar
Mixing the heated syrup in a mixer

Each quart of syrup should produce about 1.5-2lbs of sugar. It’s normal to see chunks of sugar. Those can either be used in coffee or tea or thrown back into your mixer until they break apart and are small enough use in baking or other uses.

Conclusion

Maple sugar is a great natural sweetener than can be used anywhere that cane sugar is used. Hopefully this guide has shown you some of the benefits of using natural sugars. Be sure to check out our other exclusive Guides found only on LincOn.com.


Best Self-Care Tips To Live a Happy and Healthy Life

By Gage Hanson

There’s a common misconception that to be happy you need to be successful. Hustle culture has created a society that values month-long trips to the Bahamas, six different cars and custom tailored suits as the pinnacle of human prosperity. However, you don’t need all of that to live happy. Some of the best self-care tips to live a happy and healthy life are simple, easily followed, and can be accessed by everyone on the planet.

            While happiness is an intensely personal feeling and we all get there in completely different ways, there are five self-care tips that can bring a happy life closer to you.

Spend Time Outside

            It wasn’t long ago that humans spent most of their time outdoors. Living, working, and playing indoors is a relatively new phenomena and while air conditioned buildings and couches are nice, they don’t promote a happy life or a healthy one.

Going outside can add to a happy and healthy life
Going outside can add to a happy and healthy life.

            Even if it is for just fifteen minutes at a time, you need to go outside. The health benefits are obvious. The sun gives your body access to vitamin D and the fresh air outdoors does wonders for your body. Even if you live in a big city and the air outside is heavily polluted, it is worth a fifteen minute drive to find a park where the air is much more breathable.

            Spending time outside will make you feel more connected with nature and the world as a whole. You won’t have to do much more than take a walk and your mood will see incredible improvement. Add in the next step, and the results will multiply.

Be Accountable For Something

            There’s a reason dog owners report a decline in depression symptoms. Adopting a pet, caring for plants, or even volunteering regularly at a daycare or humane society are all great ways to keep yourself happy and healthy. Every self-help guru I’ve ever respected has preached serving others as a great way to help yourself.

            Holding yourself accountable to caring for something else motivates you to move, get out of the house, and get active.

Adopting a dog can give you something to be responsible for
Adopting a dog can be one of the best self-care tips to live a happy and healthy life

Adopting a dog would undoubtedly help you spend time outside of your house and you would accomplish tips one and two in one go. However, if you aren’t ready for a pet, taking care of plants would be a good second alternative to keep you on a schedule and focused on helping another living thing.

            Even volunteering will keep you accountable for something. You can help someone else be happy and live happy yourself in the process. From boys and girls clubs to soup kitchens, there are options for any time of time commitment or skill set.

Create Something

            Even if you aren’t a skilled artist that wants to live off of your creations, creative expressions are a quick way to living a healthier and happier life. There have even been studies that prove the correlation between creation and happiness.

            You don’t have to be a master musician or professional painter either. There are a ton of hobbies that can be used as a creative outlet that don’t require tons of skill.

            The list can go on and on. The point of it is that spending an hour a day doing something creative will make you feel more accomplished. Your mood will improve, leading to improved health and more happiness.

Feel Fully, Then Let Go

            There are a lot of people that will tell you “don’t worry about it” or “don’t let it affect you.” While the intention of this type of sentiment is noble, it can lead to people bottling up emotions or not processing life events like they should.

            David Hawkins’s book Letting Go describes a process of dealing with all ranges of emotions in a healthy way that will improve the quality of your life. In a distilled version: you let yourself feel the emotions as they come to you, you observe the reactions and thoughts that they cause, then you let them pass through.

David Hawkin's Letting Go
David Hawkin’s Letting Go

It isn’t easy to accomplish this, especially at first, but if you practice being an observer of your own thoughts and actions, you will gain more mindfulness. This mindfulness will become better control of yourself as well as the ability to feel happiness when most other people are despairing over emotions they can’t properly process.

People often couple this method with meditation. Say that someone gets cut off while driving and lets this event ruin their whole day and put them in a bad mood. To improve on this situation, they should meditate on the event, realize that their anger does not change what happened, acknowledge the fact that they felt this anger, and then let go of the anger.

This methodical process leads to incredible learning and growth. As well as a naturally happy state. A state that is created even better by the next tip.

Live in the Moment

            If you live in the present moment completely, it is almost impossible to not be happy. Anxiety and stress are often caused by worrying about the future. Guilt and shame come from stressing out about what happened in the past. If you forget the past and the future, the present is often a very happy place to be.

            Even moments just as mundane as sitting on your phone reading this article are often overlooked by casual observers of the present. They don’t feel the weight of the phone in their hand, the sound of the cars driving past outside, or the faint smell of a barbecue in the distance. Too often, we don’t appreciate what is happening as it happens. We don’t consider the moment until it has passed.

            If you really, truly want to be happy, you need to let go of the past and future. They are figments of our imagination.

The past is long gone, and the future always stays off in the distance.

The only thing that ever really exists is the present, so why let yourself be bogged down by fears of anything else.

Learn to appreciate each moment as it exists in the present.

I hope you enjoyed this Guide on the best self-care tips to live a happy and healthy life. Please check out our other Guides exclusively on LincOn.com


Best Ways to Meditate: Meditate with a Mantra

Gage Hanson

If you want to improve your meditation, it may be time to meditate with a mantra.

Meditation comes with a host of stereotypes and cliches, one of which you have undoubtedly heard of is the mantra. In most pop culture representations of mediation it is a monk sitting cross-legged, repeating “om,” “peace of mind,” or “I am that I am.”

While it is easy to box mantras in as a mindless saying for meditation, they actually have extreme power. Once you’ve got the hand of meditation basics, such as focusing on breathing and your physical sensation and letting thoughts flow in and out, you may be ready to adopt a mantra and test out its effectiveness.

Meditation Intention

One of the best ways to meditate is to meditate with your intentions in mind. This will help you become a better observer of your own thoughts and reactions to the intention. The intentions of most beginning meditations are to calm your mind and become more in control.

More advanced meditations revolve around centering the self, recognizing non-duality and aligning chakras. Whichever path you are on, a mantra might help. Om meditation isn’t widely used because it is cool. It is used because it works.

Mantras aren’t just some meaningless phrase done as an empty gesture of antique forms of meditation. They are tools that can be used to improve your experience.

Best Ways to Meditate: Meditate with a Mantra

Meditation with a Mantra

Mantras benefit your meditation for two reasons. The first benefit, and the one most likely to help beginners, is a mantra that gives something for your mind to focus on as you try to let go. Most meditation practices use the breath or physical sensations as an object of focus. But mantras can serve the exact same purpose.

As you repeat a word or phrase over and over again, you can focus on this repetition and let your mind start to fall away from the normal buzz that goes on in there. Normally, there is a constant stream of consciousness running through your head. Meditation aims to stop this stream for a time being. Focusing on a mantra will keep your mind off of the thousands of thoughts it would normally revert back to.

The other benefit of using a mantra with your meditation is the transformative power of words and vibrations. Speaking or listening to a mantra invokes both the power of words and of positive vibrations, two key elements to a powerful meditative state.

Mantra Meditation Technique

To start off, you need to figure out what mantra you want to use. There are two options. You can come up with a personal mantra—my preferred technique—or you can use a classic mantra used in common meditation chants. Whichever path you choose, make sure you aren’t just picking a mantra without considering its use. You want something that strikes a chord with you emotionally, spiritually, and vocally.

The best way to meditate is to make sure you are completely in control. That should be true of the mantra you pick. You should know exactly why you chose it.

Personal Mantra

If you choose your own mantra, pick a word or phrase that means something to you and aligns with your values. It should also be something whose actual physical vibrations (the way it sounds) work with you. Something that sounds good.

Personally, I find poems as a good source of mantra inspiration. Rumi is a great author to look at for personal mantras. So are many of the poets from the transcendentalist movement in America, such as Ralph Waldo Emerson and David Thoreau.

Some mantras I like to use are:

  • So it goes
  • Love is a bridge
  • Just keep moving

Classic Mantras

Obviously om meditation is the most famous out there. Om was supposedly the sound the universe made when it came into existence. It plays a large role in Hinduism and Buddhism alike. The word itself means many different things, but is considered an incredibly powerful incantation.

Other popular mantras include:

  • I am that I am
  • Hare Krishna
  • Om Namah Shivaya

All of these have their meanings and if you plan on using a classic mantra for meditation, I suggest researching its meaning and practicing with it to see if it lines up with your meditation intentions.

Meditation Chants

Now it is time to meditate and chant your mantra. I suggest starting your meditation in the exact same way you usually do. Sit up straight, hands on your knees, and start focusing on your breaths. Keep them even and spaced out. Once you’ve started to relax and let go of the iron grip you normally have on your mind, it is time to start your mantra meditation.

Focus on the words. How they feel. How they make you feel. Then, let them pass in and out of your mind just like any thought you would have during a regular meditation session. With each repetition of the mantra, find a freshness to the words, like it is the first time you’ve recited them.

Now, depending on your meditation intention, you can continue like this or you can move on to asking yourself questions or burrowing into your own consciousness. Both of these techniques are easier once you have spent time doing basic meditation practices.

There is no “perfect” way to meditate. It is often said that everyone who meditates is a beginner and there aren’t any masters. Anybody who says otherwise has stalled their own progress. We all have something to learn.

For you, meditating with a mantra might be the best way to learn and progress. There shouldn’t be an end goal for your meditation, but rather each meditation session should help you gain a greater grasp of mindfulness. Hopefully these steps lead you to a better, more successful meditation practice in your search for enlightenment and a more peaceful mind.

I hope you find this guide useful. Please check out our other Guides available exclusively on LincOn.com.


How To Soften Cream Cheese

By Gage Hanson

Cream cheese is a popular ingredient in a lot of different recipes. Whether you are making cheesecake, a cream cheese dip, cream cheese frosting, or even marbled brownies, you will need to use a stick or two of cream cheese. The problem with cream cheese is that it is tough to mix and hard to cut up because it is initially thick and very tough to work with even when it is barely chilled. That’s why you need to know how to soften cream cheese.

Cream Cheese
Cream cheese

            If you don’t have cream cheese that is soft all the way through, you won’t be able to work it into your recipe easily. You will have chunks of cream cheese that are still in your batter or mix that haven’t softened. Soft cream cheese is instrumental to create a smooth, enjoyable final product.

Soften Cream Cheese Ahead of Time

If you have your cooking plans made well ahead of time, then you will have plenty of time for the most simple way to soften your cream cheese. It only takes an hour or two of sitting at room temperature for a stick of cream cheese to soften thoroughly. You will want to cut through the brick or stick a spoon into the tub to make sure that the cream cheese is cool all the way through. Sometimes the center will stay stiff.

            A quick way to speed up the room temperature method and make sure the cream cheese softens equally is to cut the block into smaller squares with a knife. Divide the brick into fourths vertically, and then divide those smaller rectangles into another set of fourths horizontally. These smaller cubes will thaw more evenly and quicker. They will also mix into your recipe a lot easier, or spread easier.

Warm Water and a Bag

Fill a bowl or your sink with lukewarm water. You don’t want the water to be too hot or it will melt the cream cheese into a consistency that is too liquidy. Take your stick or block of cream cheese and put the amount you need into a watertight bag. Once the bowl or sink is full, place the bag of cream cheese in the water.

            You can let the cream cheese sit in the water for about ten minutes and it should soften all the way through. In larger amounts, you might need to test the cream cheese after the first ten minutes. If it is still stiff, let the cream cheese soften for another ten minutes. It should have reached the right consistency by then.

            This is one of the better methods I have come across for warming up cream cheese (and butter/icing/anything frozen) because it ensures that the cheese will be warmed all the way through. It isn’t very messy and it is easy to ensure the correct consistency because you can feel the cream cheese through the bag. It is a little more time consuming, but well worth the time to get the perfect cheesecake.

Stand Mixer

If you are using cream cheese to cook, there is a solid chance that you have a stand mixer on hand. If this is the case, you have another incredibly easy way to soften cream cheese and get it ready for mixing with other ingredients.

Stand Mixer
Stand Mixer

            Use the paddle attachment for your mixer to create a soft batch of cream cheese. Add the cream cheese and then mix it for about a minute. If you want a softer consistency, just let the mixer work its magic for a few more seconds. If you want cream cheese that is a little stiffer, take it out after 30 or 40 seconds.

The Microwave Method

Probably the easiest and most-used method for softening cream cheese is the microwave method. It is simple, quick, and most people have access to a microwave. This method is often used by bakers to soften or even melt butter, but it works just as well for cream cheese.

Microwave Oven
Microwave Oven

            Find a microwave safe dish (a bowl is usually a better option just in case the cream cheese starts to melt) and put your desired amount of cream cheese on the dish. You will want to set your microwave to about half power and set the timer for ten seconds. After the ten seconds are up, flip the cream cheese over and microwave it again for ten seconds. I definitely recommend specifically putting ten second into the microwave instead of typing in one minute and pulling it out yourself. If you get distracted, you will have a tough mess to clean up.

            All in all, there are a lot of different methods to soften cream cheese. Hopefully there is one here that will work for your situation and give you the perfect consistency. Enjoy these techniques and good luck on your next cream cheese cooking project.


Does maple syrup go bad?

Does maple syrup go bad? Properly stored, no but it can undergo some changes. This includes crystallization and potential for mold forming on-top if given enough time.

maple syrup containers
Does maple syrup go bad?

Maple syrup is made from the watery sap produced by maple trees. This sap contains sugar that is stored in the roots and transported to to buds each spring. As the sap flows from the buds the sweetened liquid is collected and excess water removed to make the syrup. This means that it is just water and sugar and both don’t expire but they can become contaminated.

Maple Sugar Crystals

Crystals in a maple syrup container

The first way that syrup can go bad or become contaminated is with sugar crystals. This is actually perfectly fine and the syrup is still edible if you find crystals. Most syrup is made to a lighter density but at a slightly higher density it can crystallize easier. Don’t hesitate to consume it if you find crystals at the bottom of your container.

Mold on maple syrup

The second way that maple syrup can go bad is mold forming on the surface. This typically happens when the container was not properly packed or stored. You should not see mold on top of unopened containers, even if they have been sitting for years.

Mold on maple syrup
Mold on maple syrup

When the syrup is packed, it is heated to about 190 degrees and then decanted into containers and immediately closed. As it cools it vacuum seals and this vacuum should remain preventing mold from forming.

If the vacuum is broken and the syrup opened, it needs to be refrigerated to prevent mold from forming on the top. If it is left out, mold will form a few weeks at room temperature.

Some producers will advise consumers that they can skim the mold off the top and re-heat the syrup to 190 degrees but this is an older practice and it’s up to you if you want to try and recover your syrup. The syrup itself is still fine but many consumers don’t want to go through that.

Maple Syrup Expiration Dates

It’s true that some syrup containers will have expiration dates. These are mostly commercial brands that are a blend from Canada and from different producers sold in a grocery store. This does not mean that the syrup has gone bad. Grocery stores require expiration dates on all products so they can know when to rotate stocks but it doesn’t mean that the syrup expired or went bad.

Conclusion

Hopefully this helps and makes you feel more confident knowing that maple syrup does not go bad and what can happen to it. Be sure to check out our recipes that use maple syrup! If you have any suggestions for other Guides related to maple syrup, be sure to email Dave at dbroer@lincon.com.


How To Make Friends In Community College

By Gage Hanson

How To Make Friends In Community College? We’ve all been there. Graduated from high school. In college. And away from all the friends from the last twelve years of school. You have to start over again and make new friends, something you haven’t had to do in a long time. Making friends at a community college is even more difficult because of the small campus, low number of students, and high turnover rate. However, a lot of the strategies used for making friends on a bigger campus can be repurposed so you can make friends in community college.

Making friends in Community College starts in the classroom

It All Starts In The Classroom

The easiest place to start friendships is the classroom. You have to show up. 30 or so classmates have to show up. The recipe for making friends is already half done. Now, it is time for you to make an impression.

            First off, don’t sulk to the back corner of the classroom on the first day. Don’t isolate yourself just because you don’t know anybody. Nobody in that first class is going to know each other. Sit near the front of the room and close to someone else. Right when you sit down, introduce yourself to the person closest to you. You may never talk to them again, but knowing someone else’s name and them knowing your name will take a lot of pressure off of your search for friends. First introductions are done with. Second and third introductions will be much easier.

            Secondly, answer some of the teacher’s questions and join in on discussion groups. You probably have a lot of experience in classes where silence dominates most of the class time. If you become the student who keeps those awkward silences away, your classmates will get to know you. You don’t have to be the know-it-all who answers every question, but speaking up once or twice each class period will make yourself memorable. Making friends and starting introductions is much easier when classmates already know who you are. And they will be thankful you are answering questions so they don’t get called on.

Making friends in Community College happens in campus groups

Campus Groups

This strategy for making friends is definitely handcuffed in a community college environment, but that just means you have to get a little more creative. Thankfully, the internet makes that even easier.

            Every college campus has group activities. Big or small, the school will have a web page listing all these activities and campus groups. Here is an example of my alma mater’s activity page. Searching “[school name] clubs and organizations” will lead you to this page. From there, it is as easy as finding something that interests you, and then showing up to participate. Participate is the key word here.

            You may think in a smaller environment like a community college that you will stick out like a sore thumb as a new member and you will, but in a good way. I guarantee that the club will welcome you with open arms. They don’t see many new members. All you have to do is show up and you will be the most popular member of the group for a few weeks. Definitely long enough for you to make some good friends. Group activities bring people together with similar interests. It is an automatic ice breaker.

            Another easy way to meet up with people that have similar interests is Meetup. While it doesn’t necessarily limit the group members to students of the community college, it does have a wide variety of groups and activities. If you aren’t clicking with any of your classmates, this is an option to try.

Required Readings

If you want to make friends at a community college, you have to leave your dorm and make appearances at campus events. As a freshman and sophomore in college, I had a fair amount of classes that required me to attend a reading or lecture that was outside of regular class time. It is a safe bet that one of your language or science classes will require the same thing. This is more opportunity for you to spend required time with classmates making friends.

            Ask your desk neighbor or some of your classmates which reading they are going to and make plans to attend the same one. Not only does going as a group make the lecture more bearable, but you have another built in similarity with your prospective friends. Nobody likes attending these lectures. Misery loves company and nothing helps you make friends more than shared misery.

Making friends in community college starts with you.

Making Friends Starts With You

Ultimately, it is up to you whether or not you make friends. Most of your classmates are going to be in the same boat as you. They are attending a small college while most of their friends are gone. They are just as lonely as you, especially if you are all freshman.

            The problem is that all of these classmates will be too scared or nervous to make the first move. That is why you need to be the one to make the first move. There is undoubtedly a huge percentage of people in each of your classes that are scared of the exact same things you are. They will be so relieved that you approached them first. You will automatically be in their good favor.

            A lot of the fear you face when making friends is unfounded and holding you back unnecessarily. Making friends at a community college is just like it was at any point of your schooling life. Remember those days when you’d invite the new kid over to your house to play Super Smash Bros. and eat pizza rolls? It is just as easy as it was then. Once you realize and accept that the worst thing that can possibly happen is them saying no and you moving onto the next person, you will be unstoppable. You will also quickly realize that everybody wants to have friends as much as you do.

            So go out there and start making friends.

Hope you enjoyed this Guide!